E-Moto Brake Troubleshooter
Posted by Luna Cycle on Nov 6th 2026

Workshop field guide / E-moto
E-Moto Brake Troubleshooter
Start with what you feel at the lever, hear at the wheel, or see on the hose. Pick the closest symptom below. Each check starts with the bike parked.
Start here
What are your brakes doing?
Power off and stabilize the bike before a mechanical check. Let the rotor and caliper cool. Keep fingers out of moving spokes and rotors.
When a wheel or pads are removed, fit the manufacturer’s correct spacer or bleed block before any lever operation. Protect friction surfaces from fluid, sprays and greasy hands.
Symptom 01 / 07
The lever pulls to the grip
“It firms up if I pump it.”
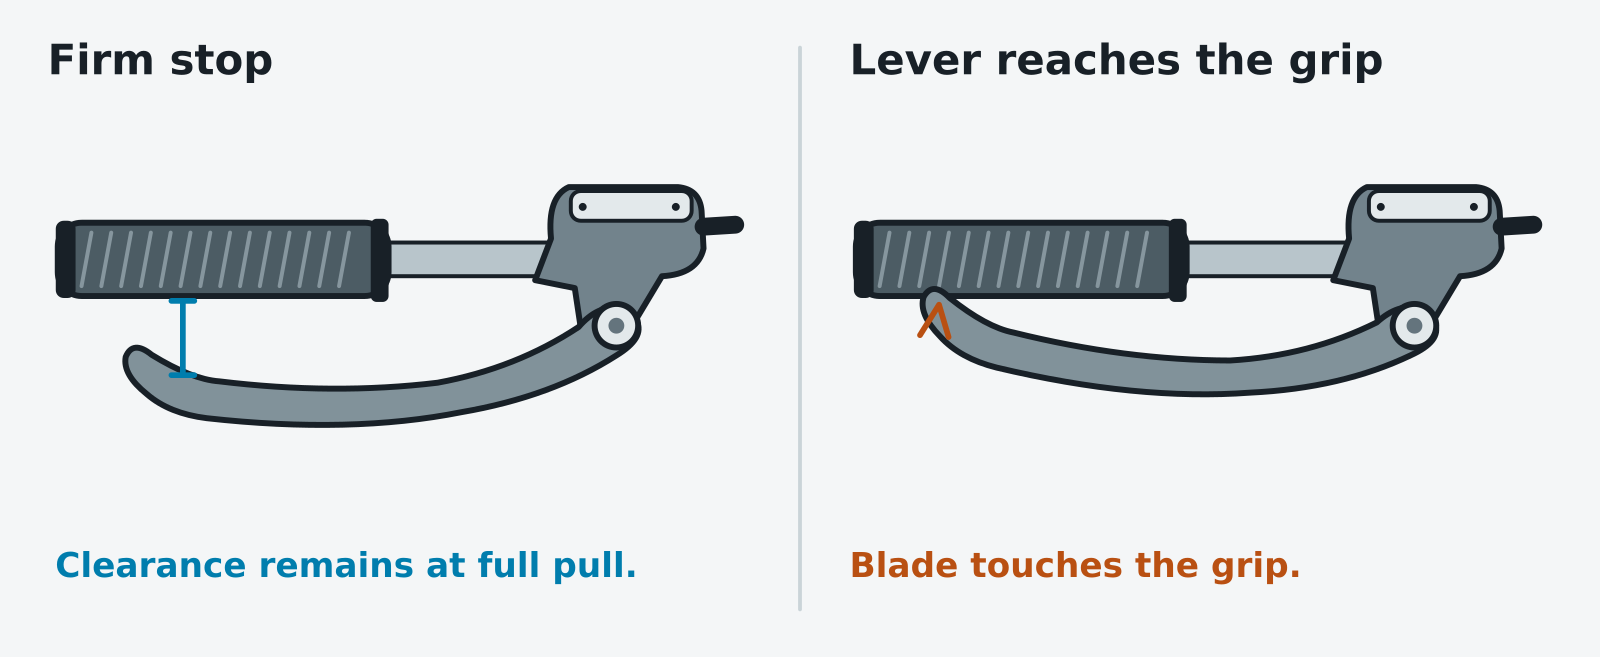
With the wheel installed, squeeze each lever separately and hold steady pressure. A lever that feels springy, slowly sinks, or reaches the grip needs attention before the bike moves.
Open full-size illustration
Check my brake fluid
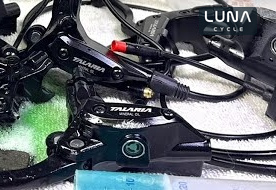
Talaria / Sur-Ron mineral-oil bleed overview
-
Check for leaks and pad wear
Power off. Inspect the lever, hose and caliper for fresh wetness. Check both pads, their retainer and the wear limit. On a new bike, photograph faults and contact Luna before opening the brake.
-
Check lever reach on the XXX, MX3 and MX4
With stock brakes and pads about half worn, check reach before bleeding. If the lever bites firmly close to the grip, follow Luna’s reach video. A lever that feels spongy or sinks still needs diagnosis.
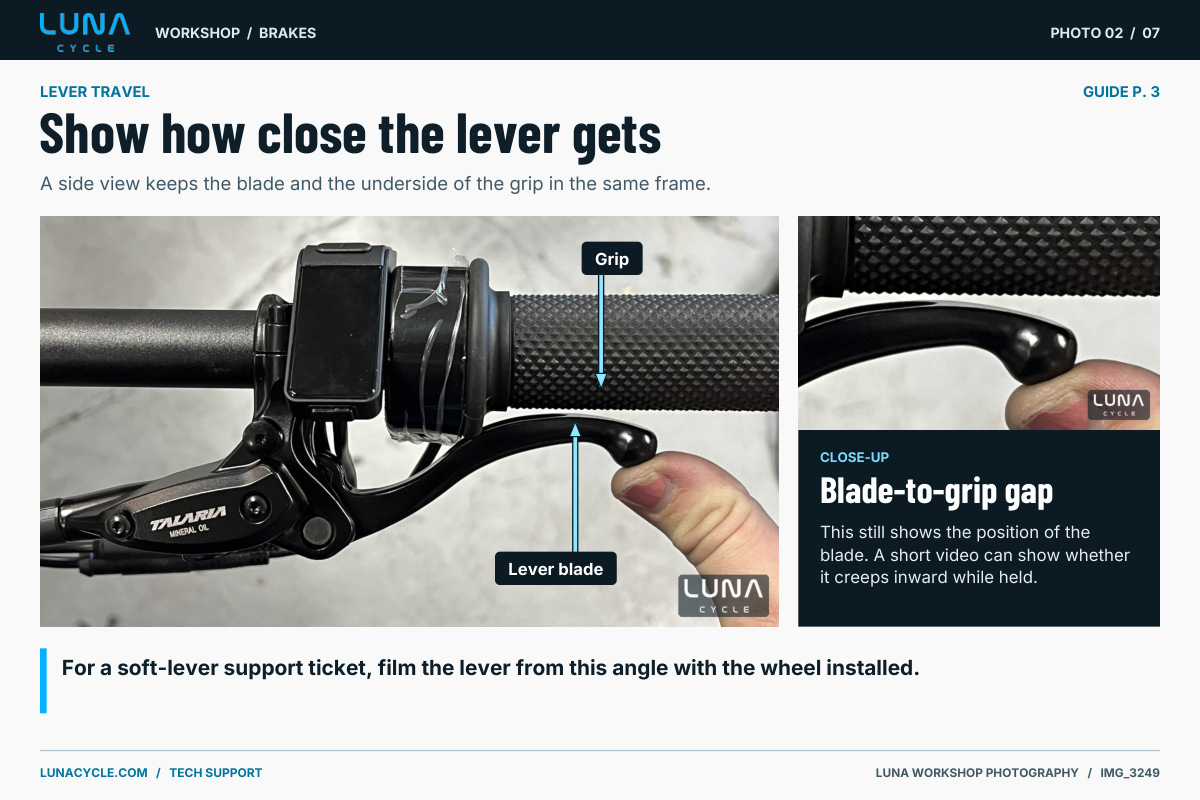
Luna Cycle workshop · Photo 02 Photograph the blade and grip together. If the gap keeps closing under steady pressure, a side-view video can show Luna what happens. Open full-size workshop photo 02 -
Choose the right service
Pad clearance or trapped air can cause long travel on a dry brake. Use the specified spacer, tools and reset, purge or bleed procedure. Check the cap first. The stock MX5 Pro cap lists DOT 3 or DOT 4. Light Bee fluid varies by version.
-
If the first bleed leaves the lever soft
On a dry system, Luna’s shop may repeat the prescribed bleed two or three times to clear trapped air before replacing parts. If the lever sinks under steady pressure, stop and have the master cylinder checked.
Symptom 02 / 07
Squeal, scrape or grind?
“It makes a noise every time I slow down.”
Notice when the noise happens. A scrape once per wheel turn, a squeal only while braking, and a harsh grind point to different checks.
Open full-size illustration
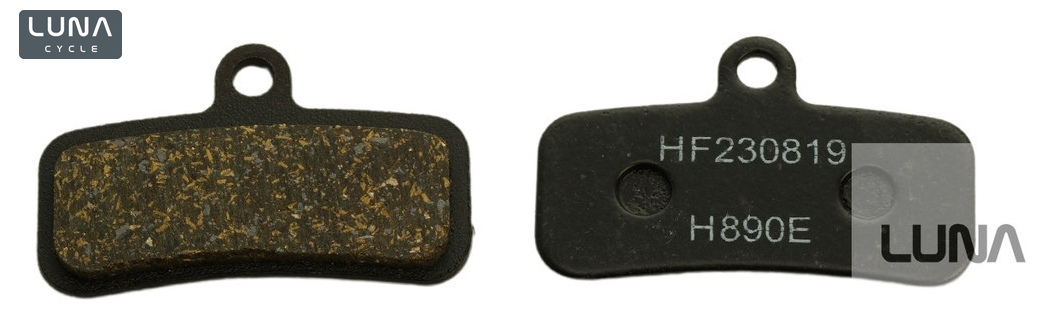
Photo · Luna Cycle
-
Grinding under braking
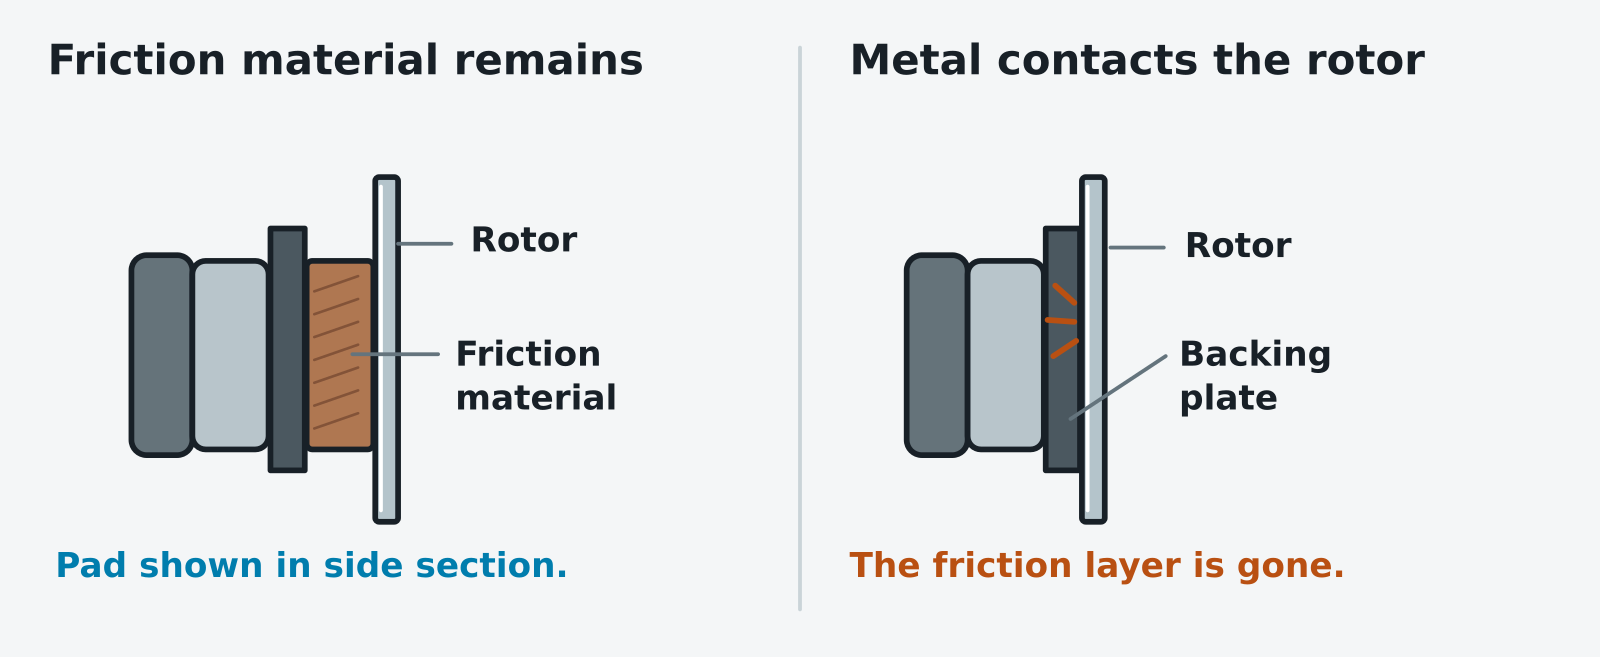
Park the bike. Check for bare steel on the pad face. If the backing plate has ground against the rotor, Luna’s shop replaces both pads and the rotor on that wheel. Bed in the replacements before normal riding.
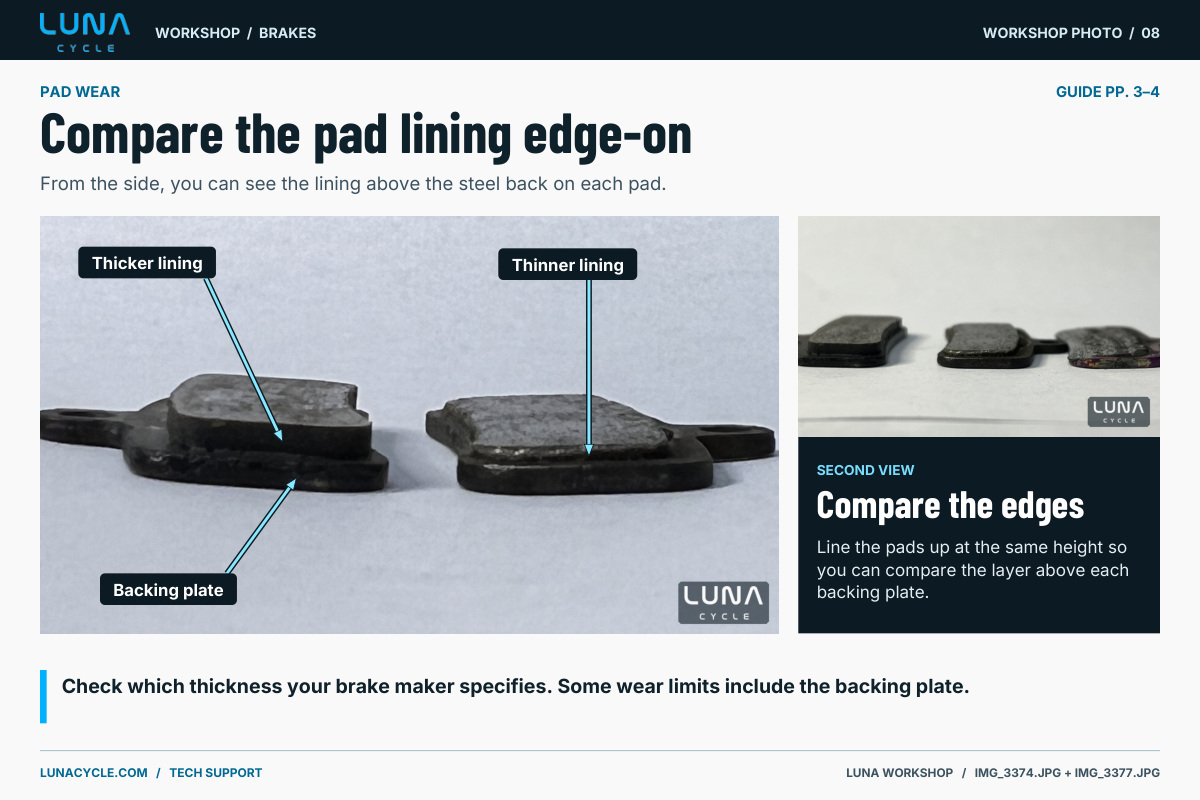
Luna Cycle workshop · Photo 08 Look at the friction lining above the backing plate. The left pad has more visible lining than the right. Check the wear limit for your fitted brake. Open full-size workshop photo 08 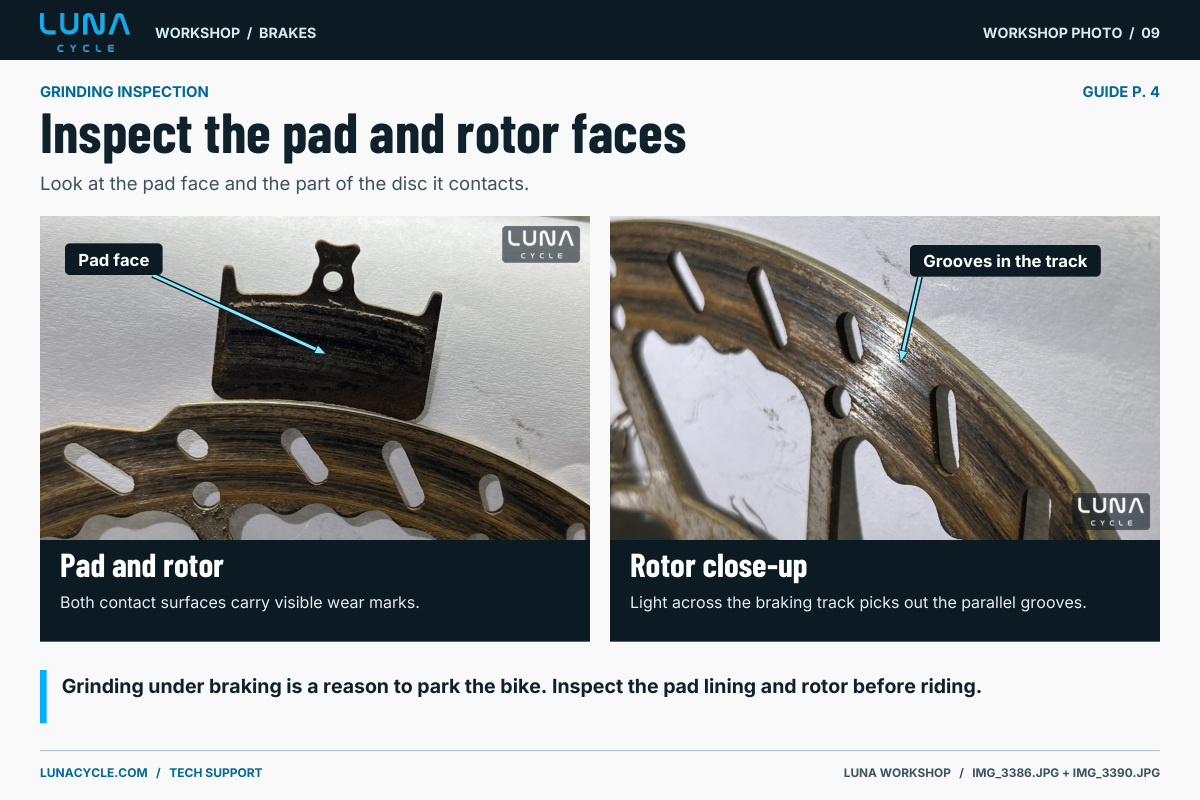
Luna Cycle workshop · Photo 09 The shop’s grinding example shows marks on the pad and grooves on the rotor. Photograph both contact surfaces when reporting a grinding noise. Open full-size workshop photo 09 -
Squeal when wet or after a pad change
Moisture can make a brake noisy. If it still squeals when dry, check pad seating, contamination and bedding. Weak braking needs inspection even if the sound goes away.
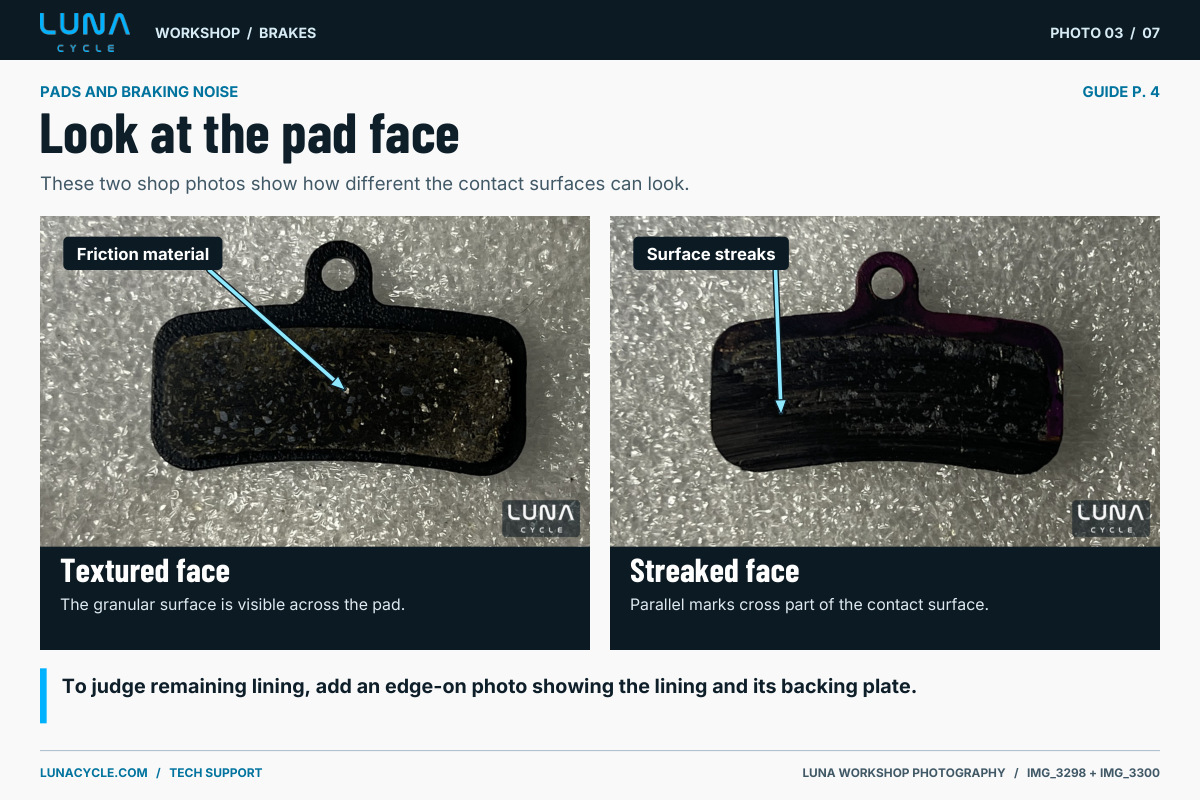
Luna Cycle workshop · Photo 03 These pad faces show a granular texture and a streaked surface. To show how much lining remains, also photograph the pads edge-on. Open full-size workshop photo 03 -
Oil on a pad or rotor
Replace oil-soaked pads. Clean the rotor using the brake maker’s approved method, or replace it if the maker requires it. Keep lubricants, skin oils and dirty rags off the braking surfaces.
-
New friction surfaces
Once the bike passes its checks, follow the pad or brake maker’s bed-in sequence in a clear, level, permitted area. Brake progressively to walking pace without skidding. Use the specified repetitions and cooling period.
Symptom 03 / 07
It stops cold, then fades
“Halfway down the hill, the bite disappears.”
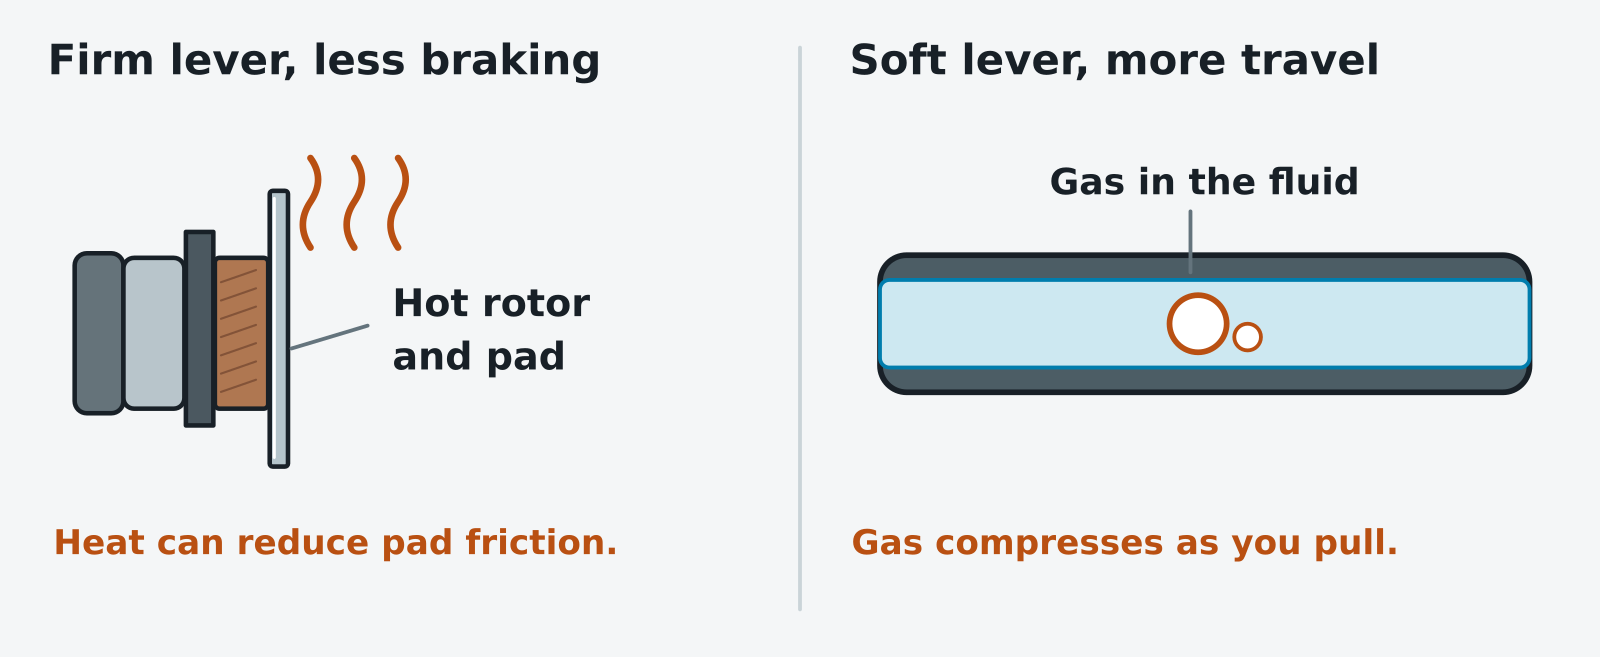
Lever feel helps separate two heat problems. A firm lever with weak bite points toward the friction surfaces. A lever that suddenly travels farther when hot can mean gas or vapor in the hydraulic circuit.
Open full-size illustration
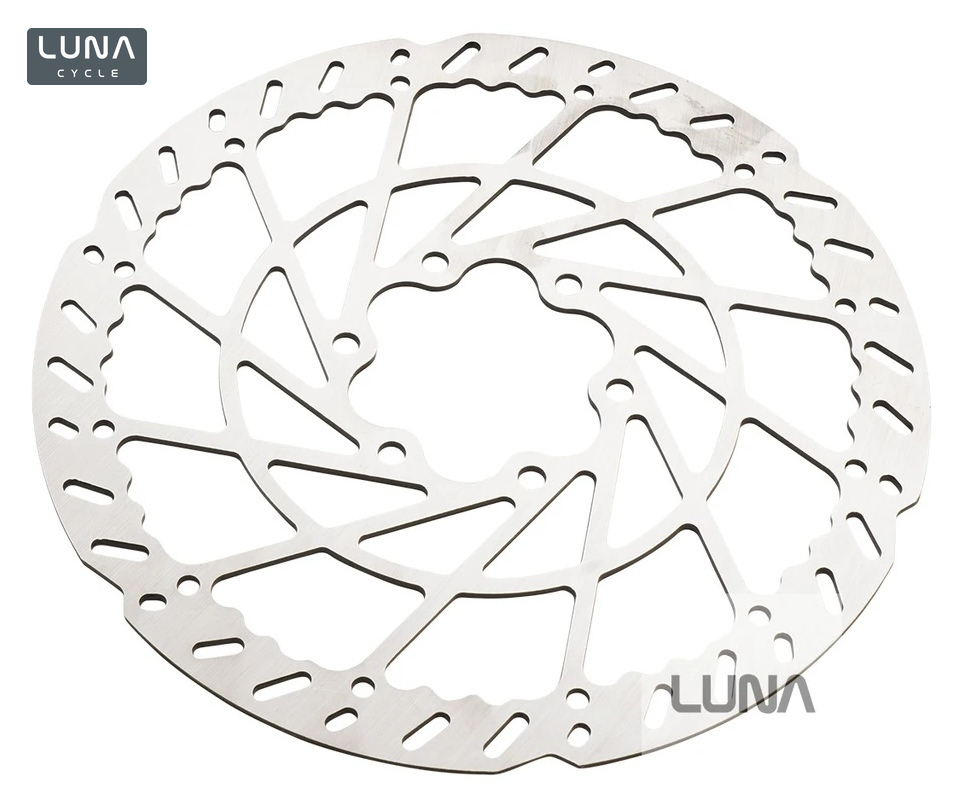
Photo · Luna Cycle
-
Weak from the first squeeze
Inspect the pads and rotor for wear, contamination or an incompatible pad compound. Confirm the caliper is secure. Bed in clean new pads only after the brake passes its mechanical checks.
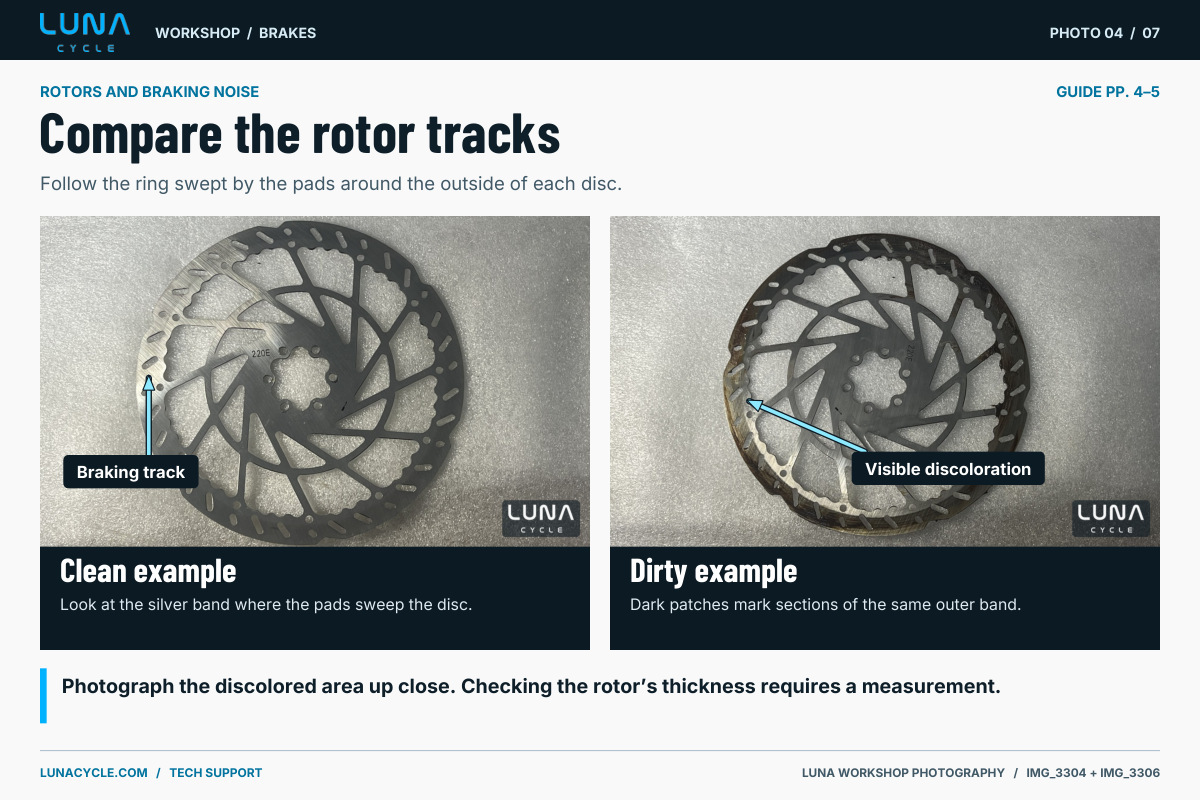
Luna Cycle workshop · Photo 04 Compare the outer bands on the shop’s clean and dirty rotors. Photograph any discolored patch close up so Luna can see where it sits on the track. Open full-size workshop photo 04 -
Power drops on a descent
Bring the bike to a controlled stop in a safe place. Let both brakes cool naturally. Rotors and calipers can burn skin. If stopping power or lever travel changed noticeably, keep the bike parked until the cause is found and corrected.
-
Check how heat is being managed
A dragging pad can heat a rotor even when the lever is released. Before a long descent, choose a manageable entry speed and use both brakes progressively. Stop for cooling breaks when conditions demand it.
Symptom 04 / 07
One tick per turn
“The wheel makes a zing even with the lever released.”
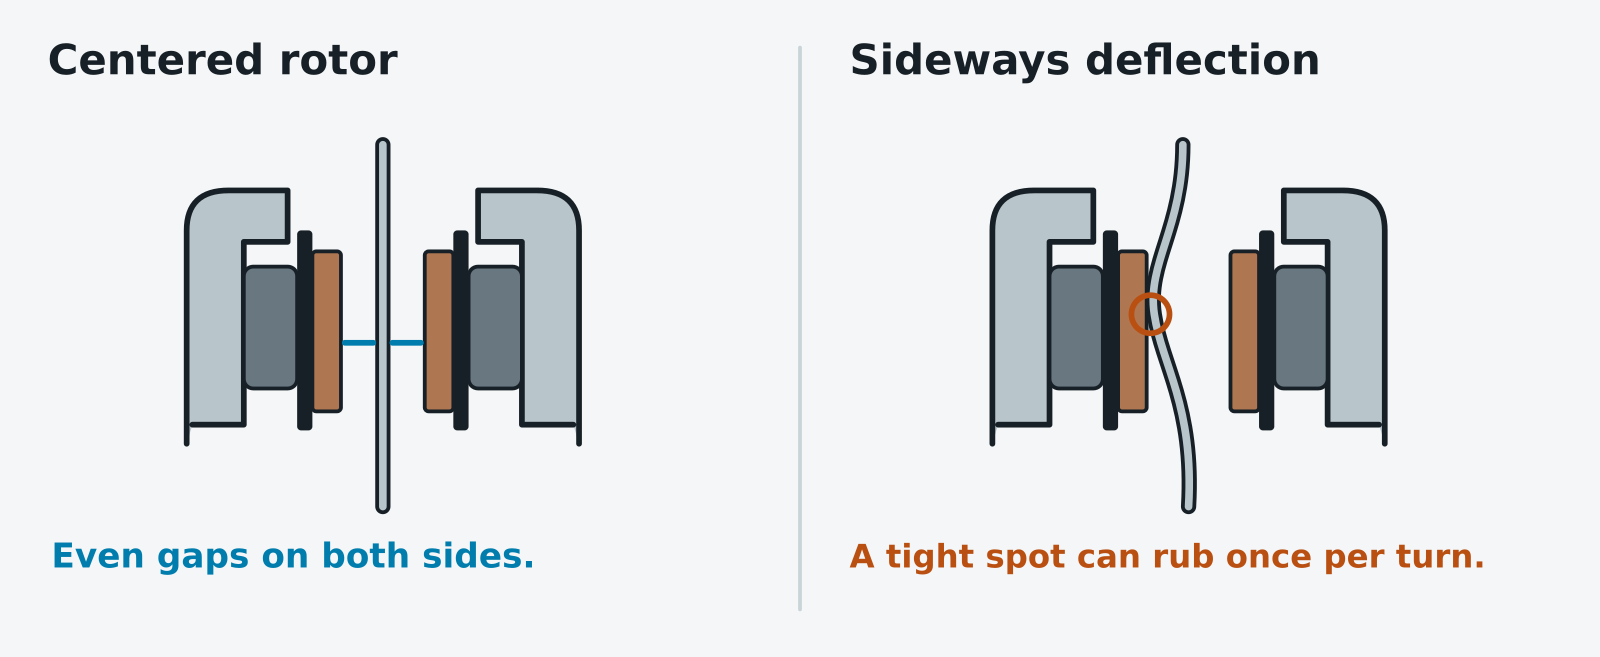
Power the bike off and support it securely. With the brake cool, turn the wheel slowly by hand and sight through the caliper against a light background. Keep fingers clear of spokes, rotor and chain.
Open full-size illustration
Photo · Luna Cycle
-
Watch one full rotation
If the gap closes at the same point each turn, inspect the rotor for lateral runout. A gap that stays tight on one side suggests caliper alignment or a piston that is not retracting.
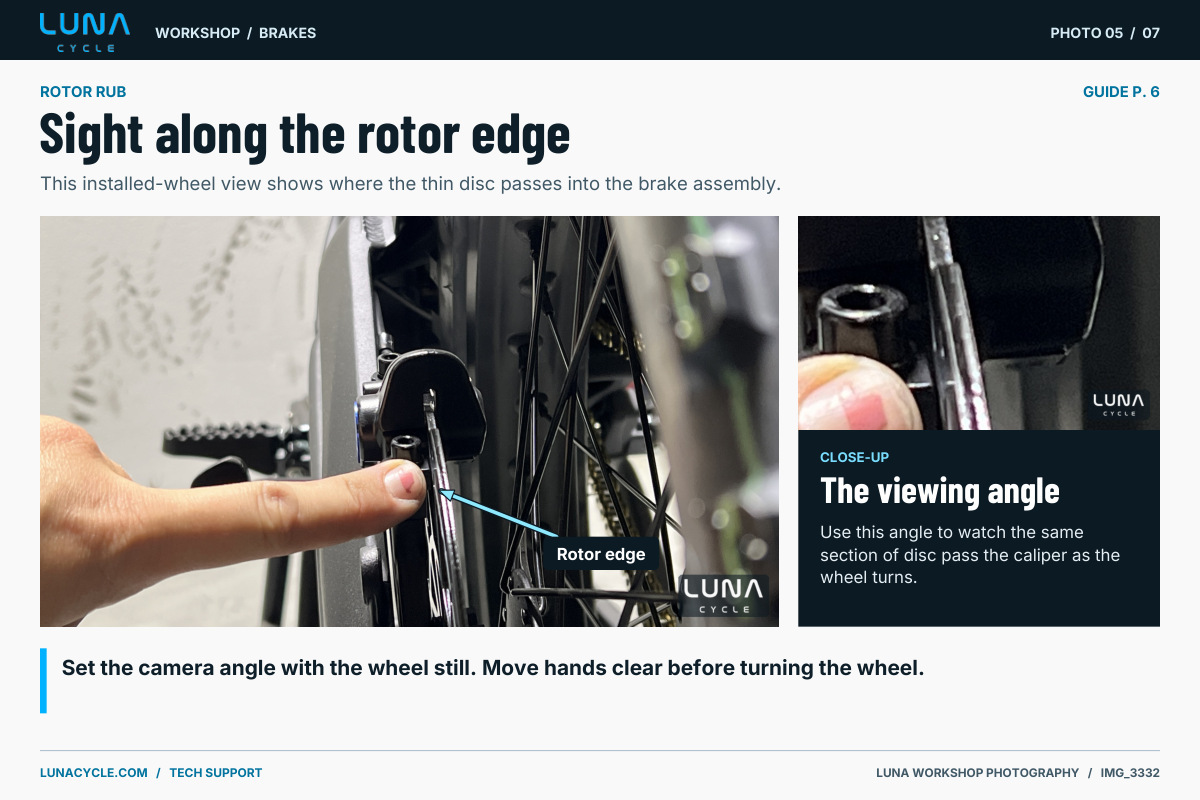
Luna Cycle workshop · Photo 05 Set the camera angle while the wheel is still. Move your hands clear before turning the wheel to record a repeating rub. Open full-size workshop photo 05 Luna Cycle workshop · 11-second silent videoWatch the rotor pass through the caliper Watch the silver rotor edge pass the fixed caliper as the wheel turns. Use the caliper as the reference when checking whether the gap changes.
Watch the shop video on YouTubeSee the annotated still from the video
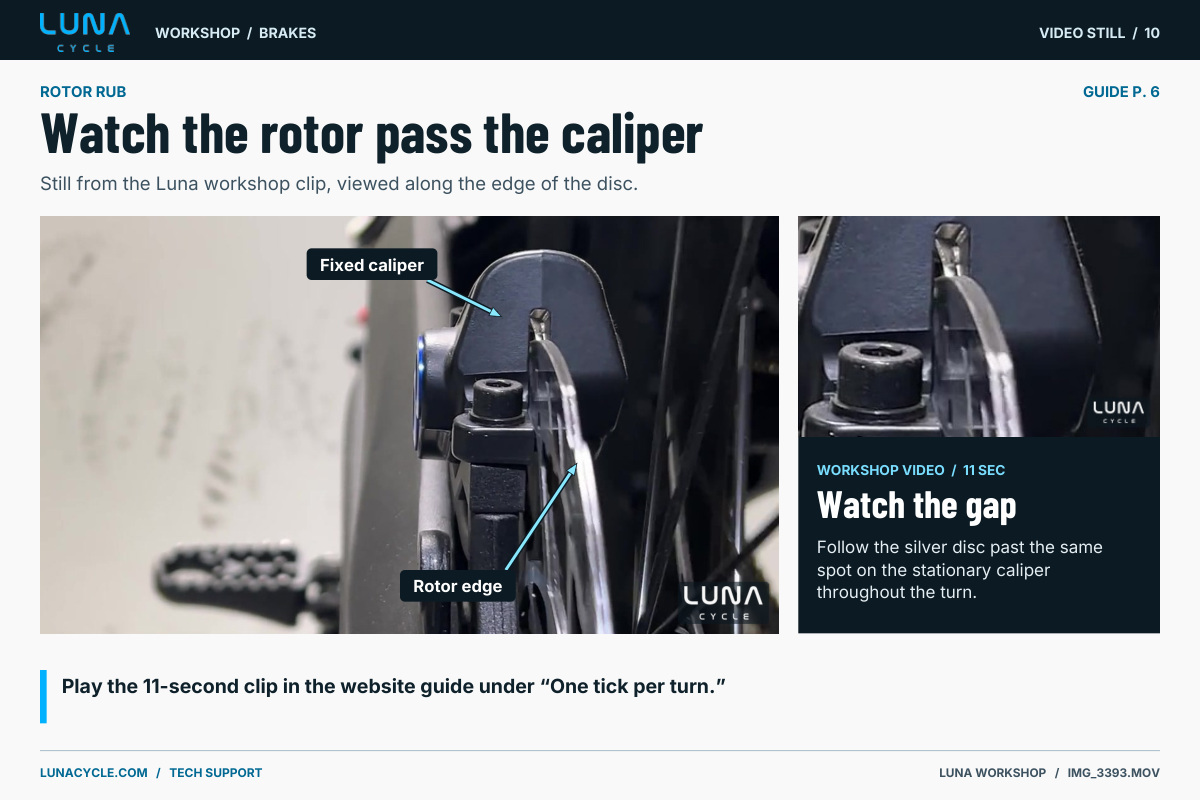
Luna Cycle workshop · Photo 10 Use the stationary caliper as your reference and watch the same gap through a full turn. The shop video shows the viewing angle. Open full-size workshop photo 10 -
Check the wheel first
Confirm the wheel is fully seated and the axle is secure to the model’s specification. Look for a loose caliper or rotor. Wobble at the hub or a visibly distorted or cracked rotor needs service.
-
Center the caliper, then recheck
Use the installed brake’s alignment method and specified mounting torque. If the brake still drags, a technician can check piston return, wheel bearings and residual hydraulic pressure.
Symptom 05 / 07
Trace the wet spot
“There’s oil at the lever, or a wet patch on the caliper.”
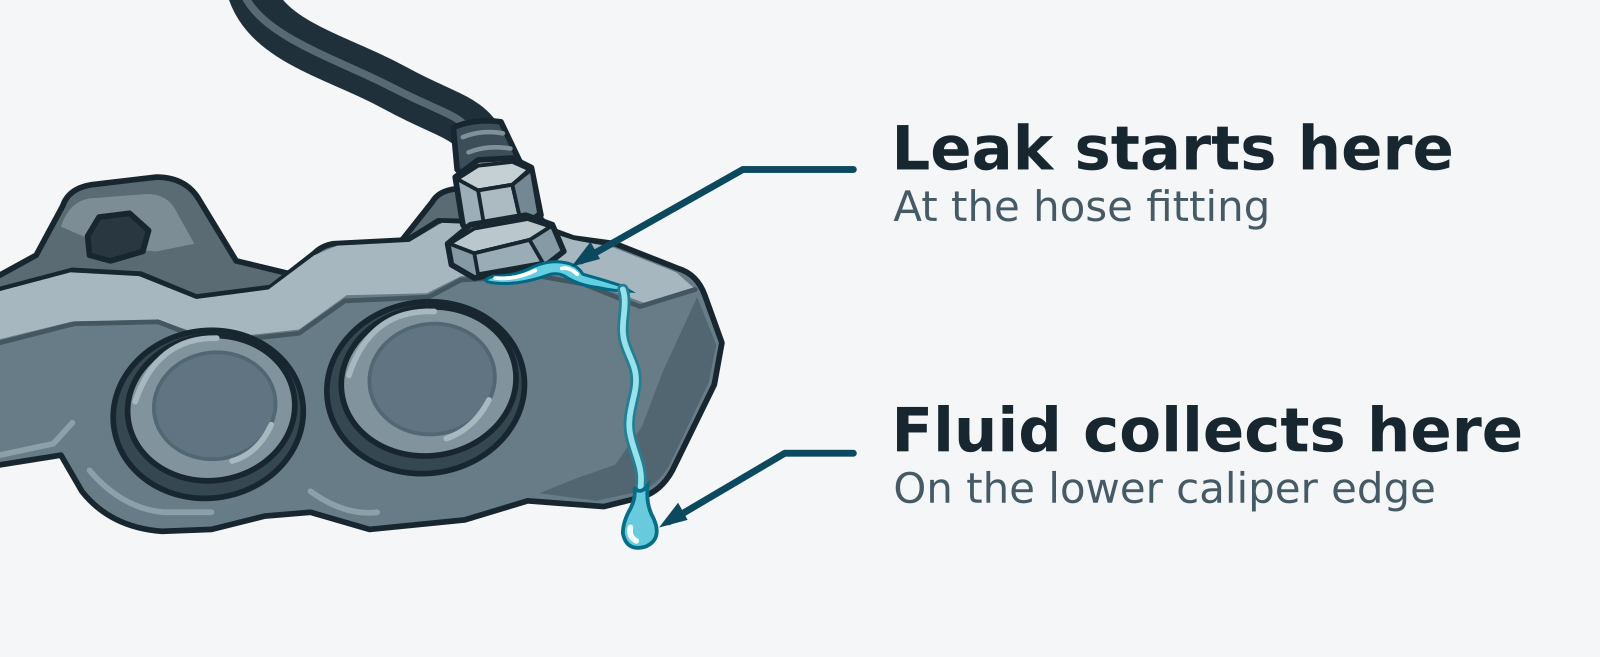
Park the bike. Fluid can travel down a hose before it drips, so the lowest wet point may be some distance from the leak. Keep the pads and rotor clear of drips.
Open full-size illustration
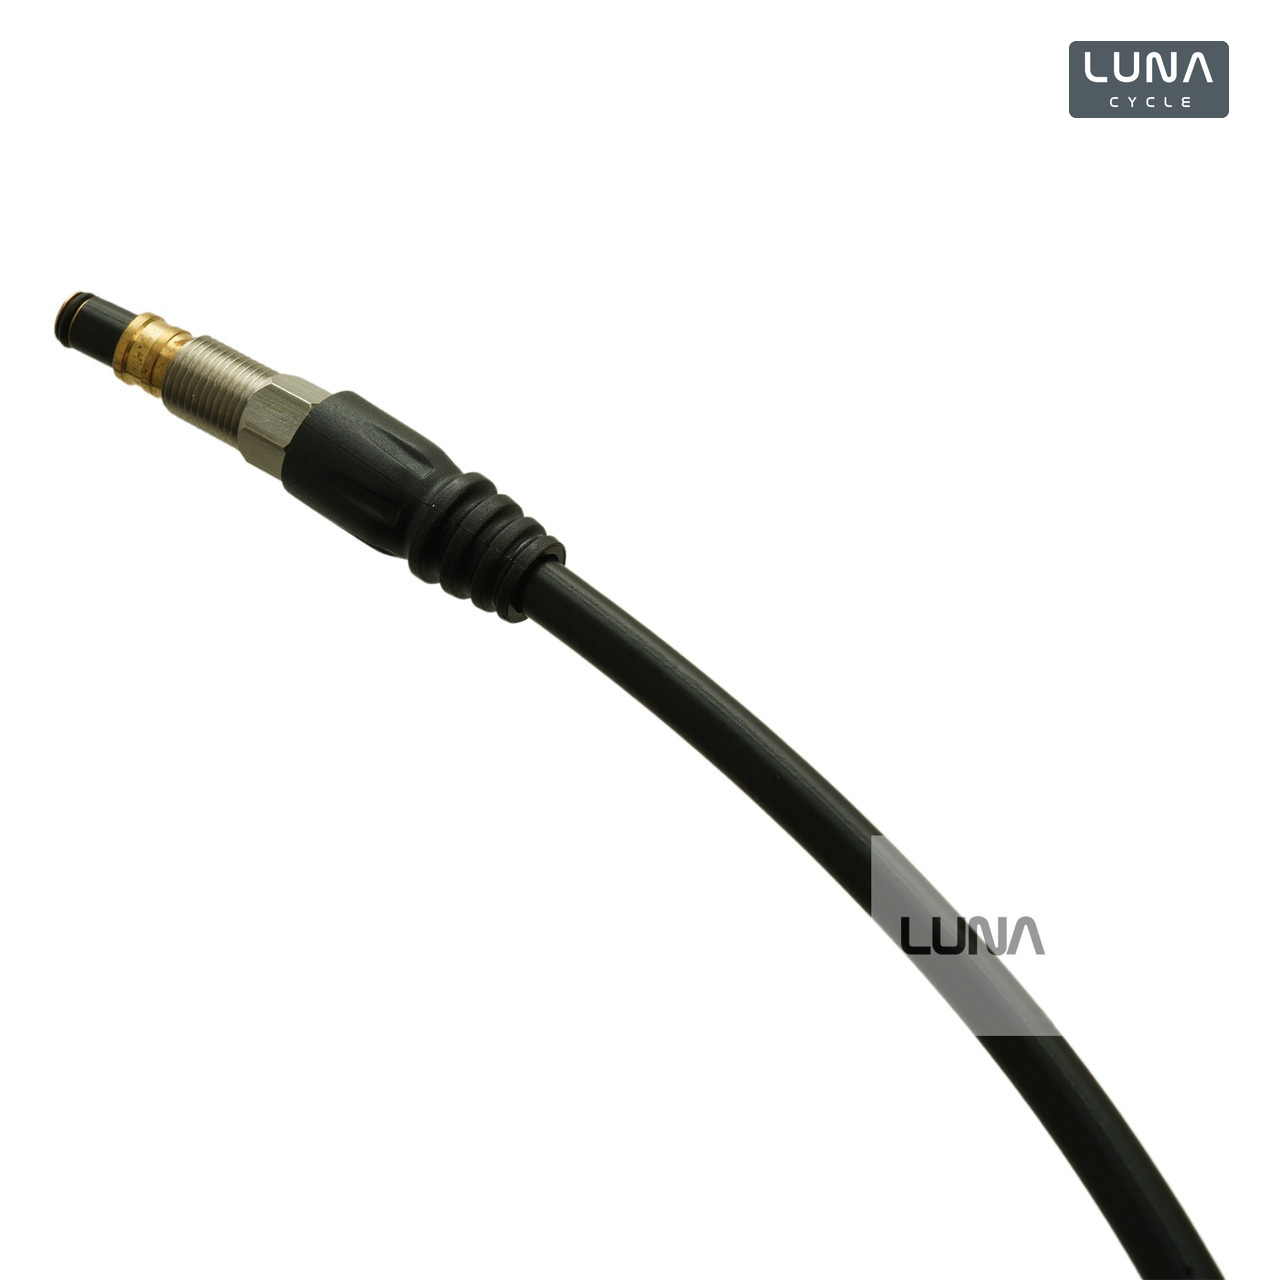
Photo · Luna Cycle
-
Start with a clean reference
With cool brakes, wear suitable gloves and blot suspect areas with a clean lint-free cloth. Inspect in good light, from the reservoir and hose joint down to the caliper.
-
Trace the hose and both ends
Look for chafing, a sharp kink, a split in the outer jacket, or fresh wetness at a fitting or bleed port. If the hose is split or spraying, leave the lever alone. Photograph the first wet spot.
-
Repair the source before bleeding
A damaged hose, fitting, seal or body needs the correct replacement or service. Tightening by feel can strip a port. Use the specific service procedure and torque. After opening a line, bleed with the correct fluid and replace contaminated pads.
Symptom 06 / 07
The lever took a hit
“The blade snapped in a fall. What do I order?”
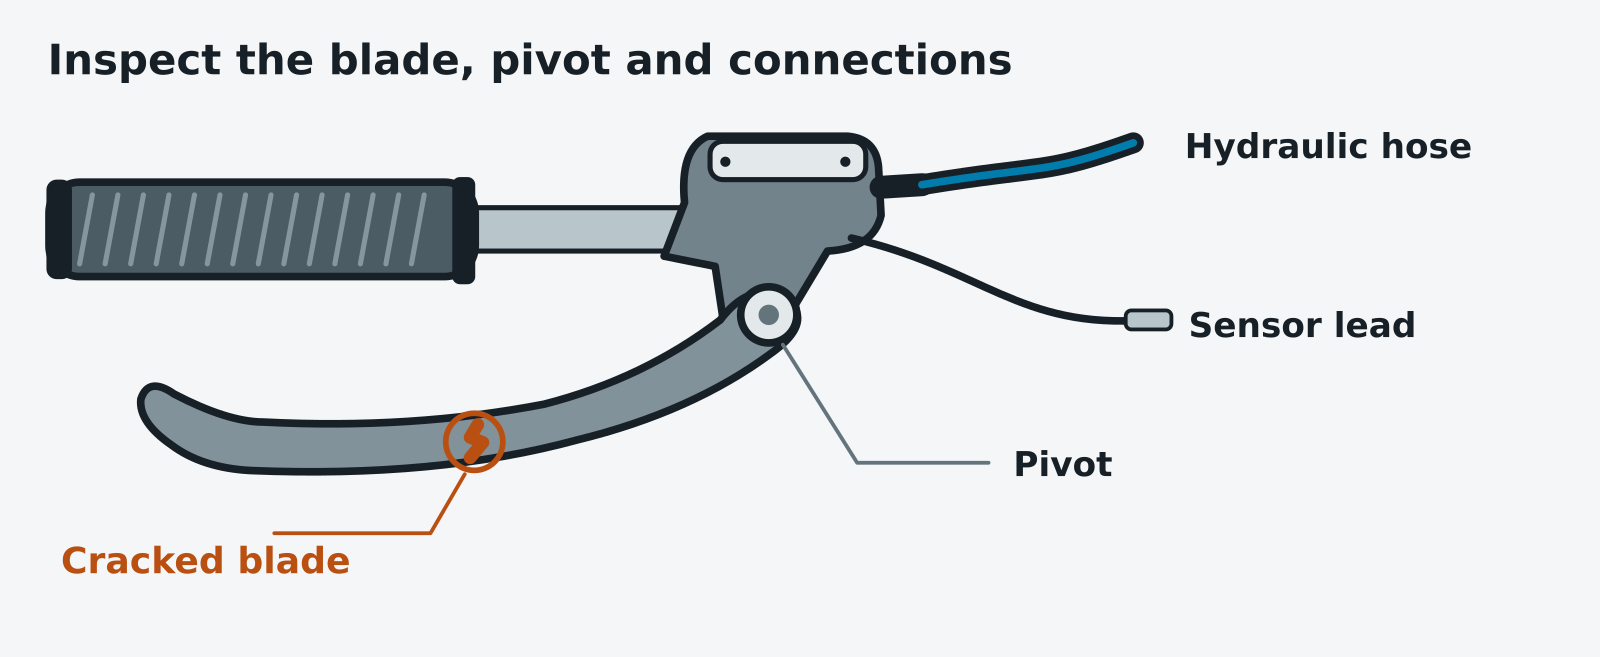
The blade is the part your fingers pull. The master cylinder is the hydraulic body it pivots against. A crash can damage either one, as well as the hose connection or sensor lead.
Open full-size illustration
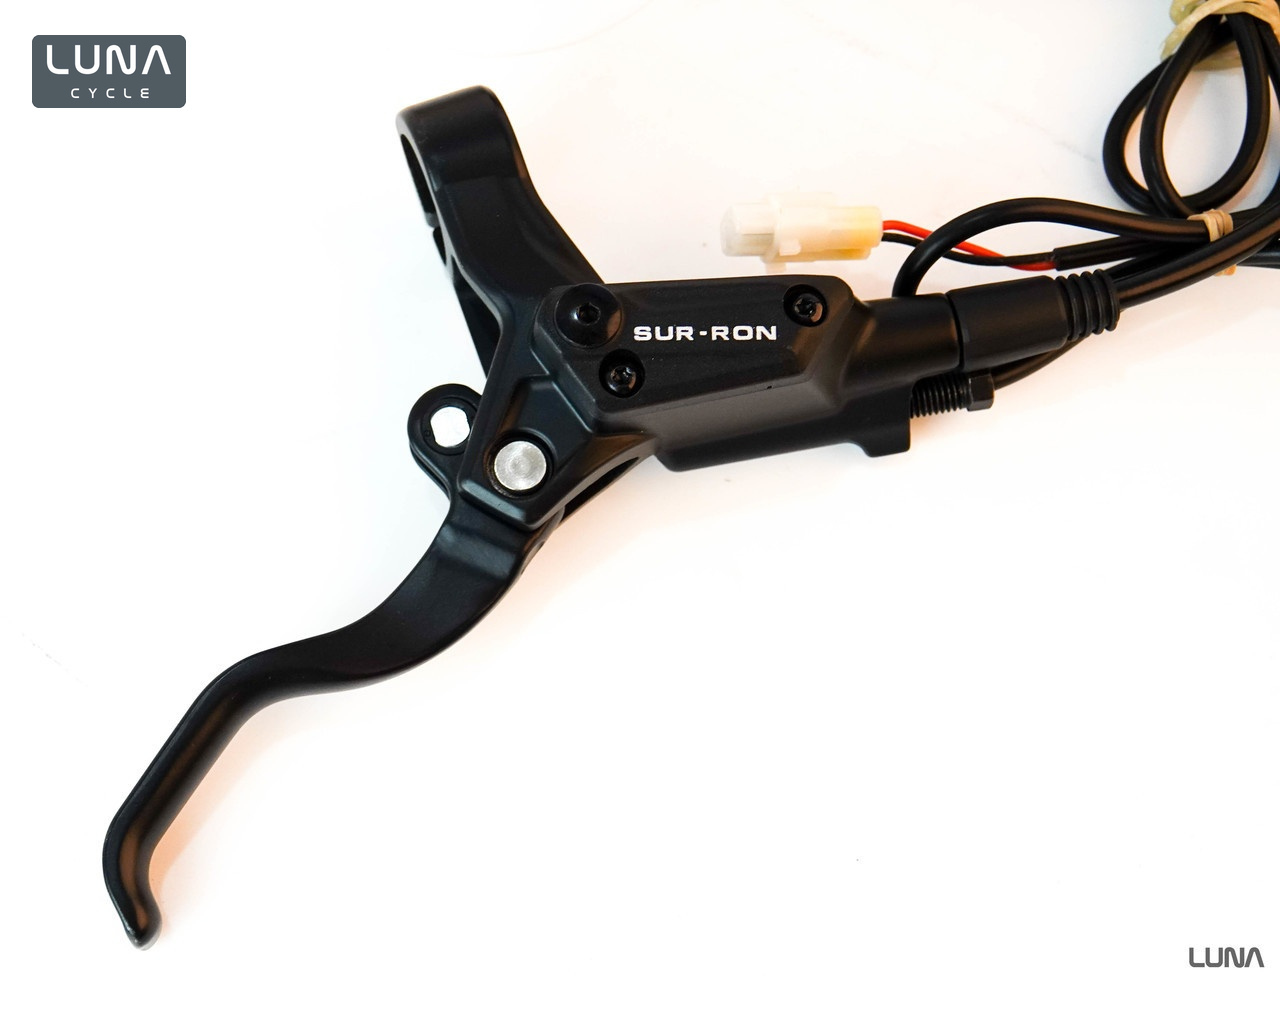
Photo · Luna Cycle
-
Inspect the whole assembly
Power off. Look for a cracked or bent blade, a loose pivot, a cracked clamp or body, wetness, and a pinched hose. Check the wheel, rotor and caliper on the impact side too.
-
Identify the exact replacement
Photograph the cap marking, lever pivot and caliper. Match the brake, year and axle. On the stock MX5 Pro, the front lever assembly is 35460-56C00-000 and the rear is 35540-56C00-000. Send Luna the photos if unsure.
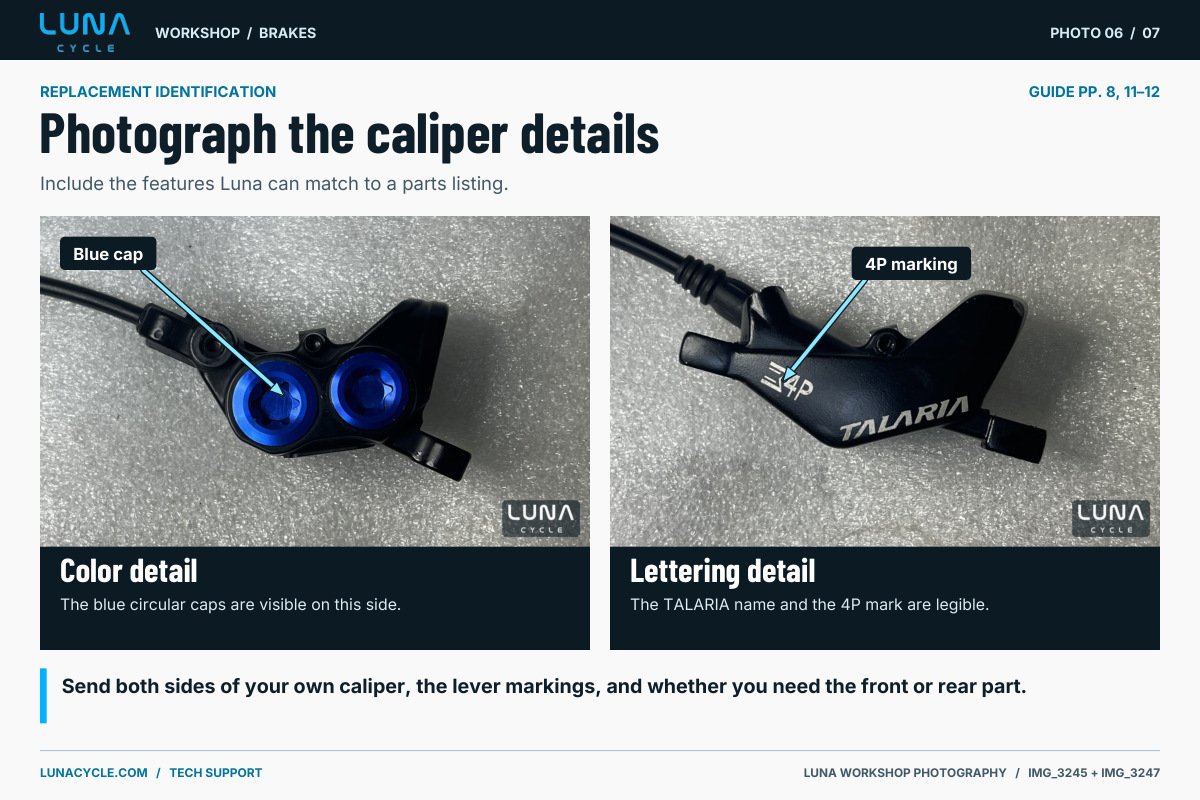
Luna Cycle workshop · Photo 06 Include the visible cap color and lettering when asking for a replacement. Photograph both sides of your own caliper and specify front or rear. Open full-size workshop photo 06 -
Match the repair to the damage
A blade-only repair can leave the line sealed. A complete pre-bled front brake can stay sealed during installation. If the rear hose must be disconnected to route it through the frame, bleed after reconnecting. Check for leaks, lever pressure and sensor operation.
Symptom 07 / 07
The motor cuts out
“The brake is released, but the bike still thinks I’m braking.”
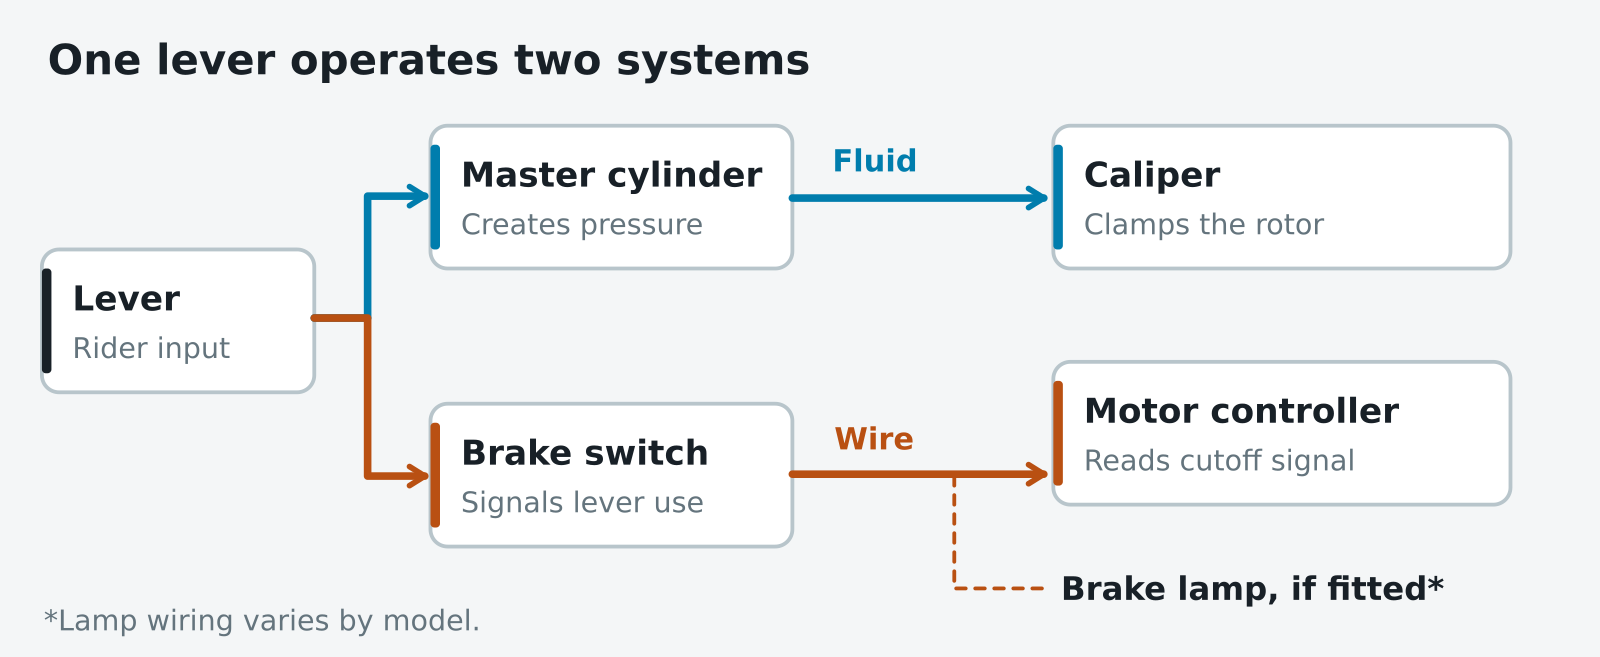
On bikes with a brake cutoff, motor assistance should cut when a lever is applied. A signal that stays active after release can inhibit drive. Hydraulic stopping power and electrical signaling require separate checks.
Open full-size illustration
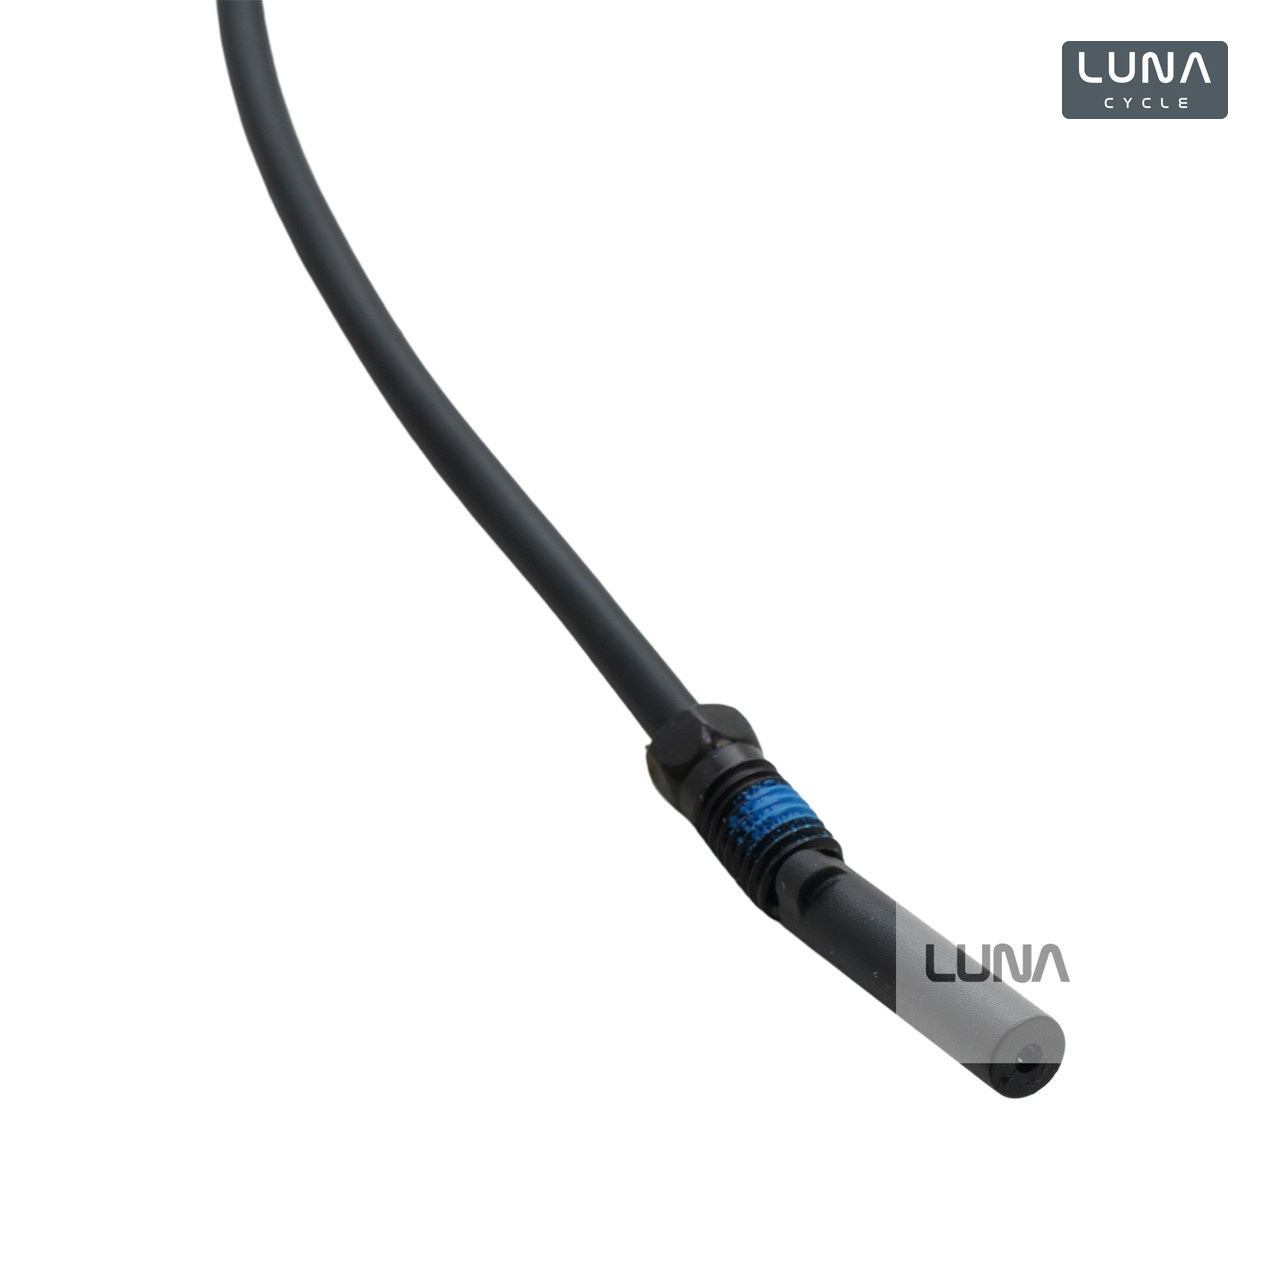
Photo · Luna Cycle
-
Check lever return first
With power off, let each lever return fully. Look for a bent blade, handguard interference, a pinched sensor wire, or a connector pulled loose at the lever. Correct mechanical brake faults first.
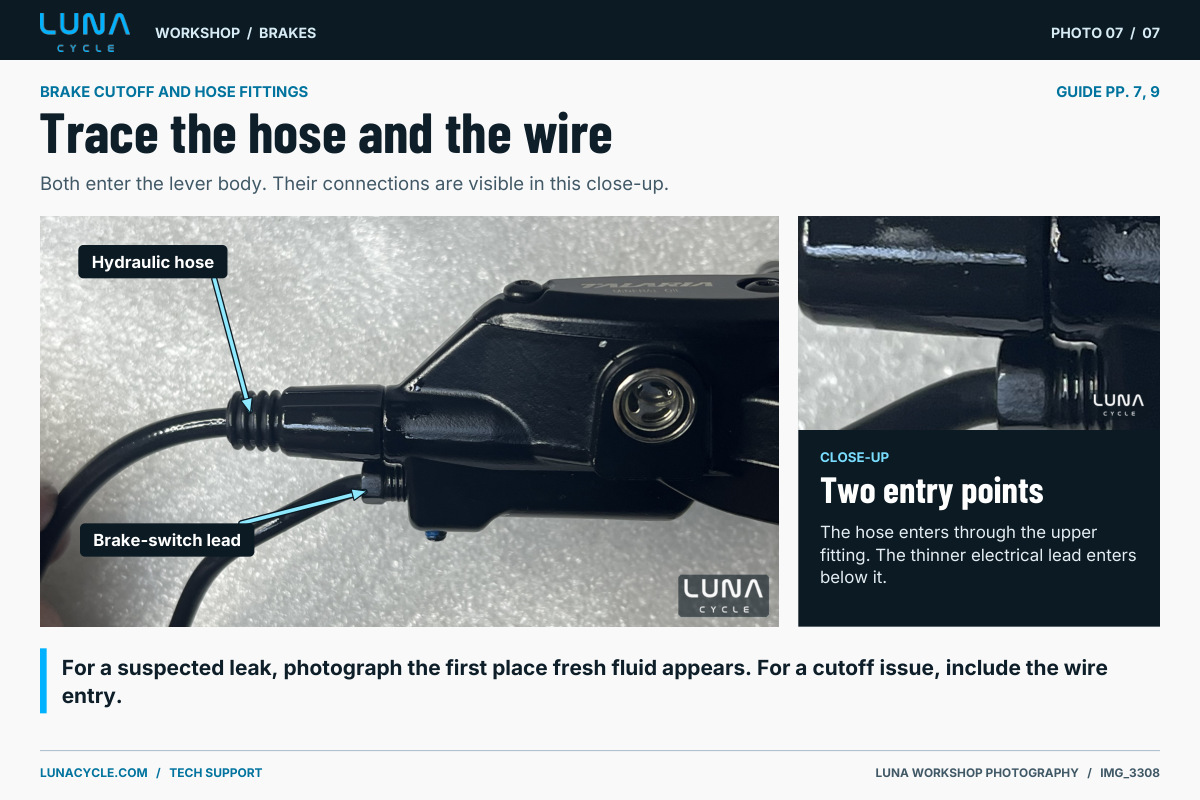
Luna Cycle workshop · Photo 07 The hydraulic hose enters the upper fitting on this lever. The thinner brake-switch wire enters below it. Include both connections in a support photo. Open full-size workshop photo 07 -
Check the lamp only if fitted
Secure the bike and leave the throttle untouched. With the lights on and drive disabled if available, try each lever. XXX lighting varies by build. Some rear lamps are running lights only.
-
Record the symptom before buying a switch
Note which lever triggers the issue, whether the lamp changes, and any display code. On early original XXX bikes, a harness fault can mimic a bad switch. Use the model guide or send Luna the details.
Workshop reference / 01
Which brake fluid?
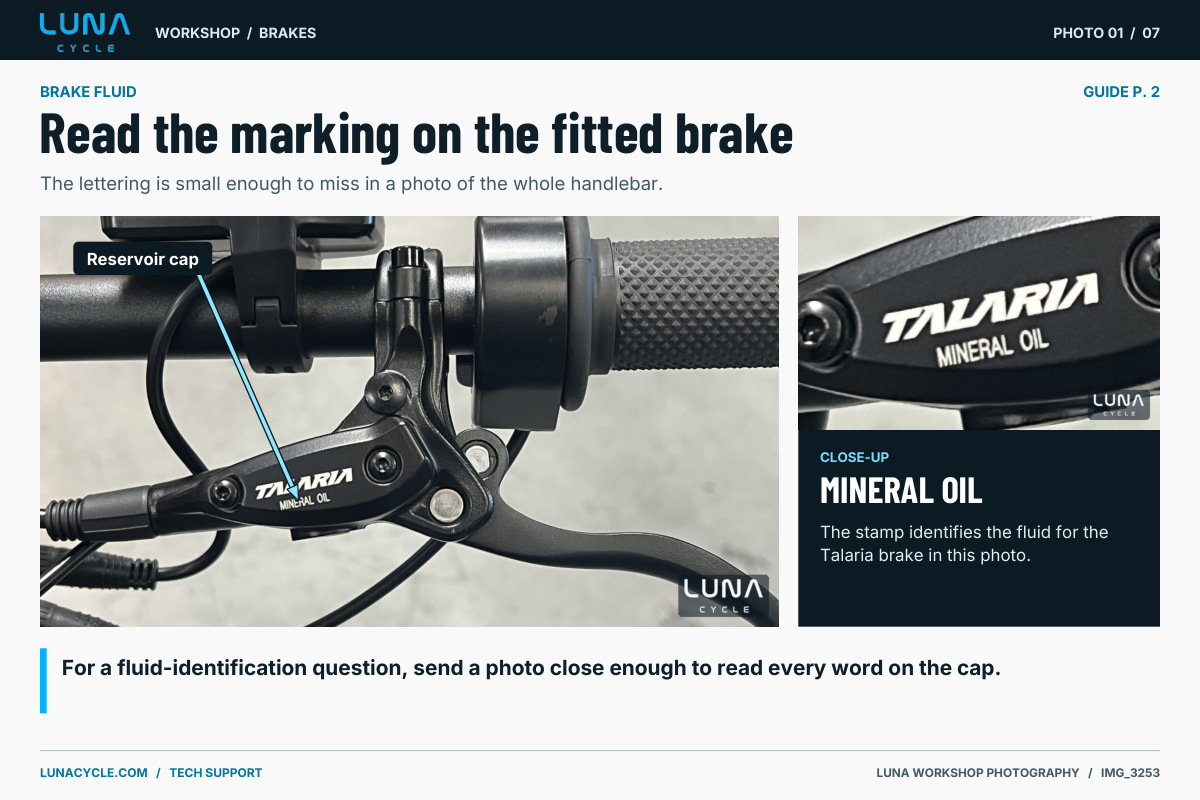
Read the reservoir cap and check the manual for the fitted brake. If the hardware is unfamiliar or has been changed, send Luna photos of the cap lettering, the whole lever including its tip, and the caliper markings before adding fluid. Use dedicated bleed tools.
| Bike or brake system | Fluid family | What to verify |
|---|---|---|
| E Ride Pro SS 3.0 | DOT 4 | The Type 1 cap reads E RIDE PRO / DOT4. Type 2 has a ball-ended lever and a WARNING cap marked for DOT 4 or DOT 3. Use DOT 4 for either stock version. Model reference · Type 1 cap photo · Type 2 lever and cap photo |
| Talaria Sting MX3 / MX4 | Brake mineral oil | Stock mineral-oil systems. Match the specified brake oil and the fitted hardware. Model reference |
| Talaria XXX / XXX Pro | Brake mineral oil | Luna’s stock-brake guide covers the original XXX and Pro. Check the fitted assembly. Model reference |
| Talaria XXX Mini | Brake mineral oil | The 2026 Mini manual specifies HF10-2 mineral brake oil. Match the manual for your build. Model reference |
| Talaria Sting MX5 Pro | DOT 3 or DOT 4 | Luna’s pictured OEM reservoir accepts either grade. Read the cap on your fitted brake. Model reference |
| Talaria Komodo (TL6000) | DOT 4 | Use fresh DOT 4 from a sealed container. Stock front and rear rotors are 240 mm. Model reference |
| Sur-Ron Light Bee | Version-specific | Earlier systems use mineral oil. The 2024 3C uses DOT fluid. Identify your installed brake and grade. Model reference |
| Luna X / changed brakes | Read the cap | Read the cap on the fitted brake. If it is unmarked or unreadable, send Luna photos of the cap, lever and caliper. Model reference |


If fluid types have been mixed, stop using the bike and tell the technician exactly what went in. Incompatible fluid can damage seals and require component replacement.
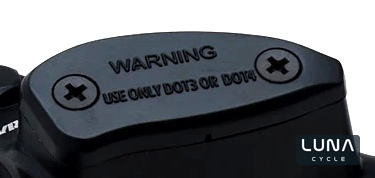
View Luna’s OEM lever photo
Workshop reference / 02
Maintenance & return to riding
-
Before the first ride
On any new bike, spin each wheel and inspect for rotor damage from shipping. Test both levers. Resolve drag or a soft lever before riding, then bed in the pads as the brake maker directs.
-
Before each ride
With wheels installed, squeeze each lever separately. Look for leaks, loose hardware and worn friction material. Hold pressure and check for creep. Walk the bike and confirm each brake stops its wheel.
-
After a crash, muddy ride or wheel change
Clean and dry the bike. Inspect the rotors, pad retainers, mounts and hose routing. With an unloaded wheel, check for a repeating rub and confirm free release.
-
At the service interval
Use the pad and rotor wear limits, torque values, approved fluid and service schedule for the installed system. Check sooner if feel or performance changes. Record the date and what was fitted.
Workshop reference / 03
Parts & upgrades
To check pad wear, find out whether your brake maker’s limit includes the backing plate. Use the minimum stamped on your rotor or listed for that exact part.
| Luna Cycle part | Fitment | Part number |
|---|---|---|
| Stock replacement pads | Original Talaria XXX, Sting MX3 and MX4 R. Match the pad outline. | 35533-56A00-000 |
| MX5 replacement pads | MX5 Pro stock caliper. Choose the dedicated MX5 pad set. | 35533-56C00-000 |
| MX5 caliper | MX5 Pro front or rear. Verify the fitted hardware. | 35532-56C00-000 |
| MX5 lever assembly | MX5 Pro only. Front and rear assemblies differ. | Front 35460-56C00-000 / rear 35540-56C00-000 |
| Cutoff sensor | Original XXX and MX4. Match the connector. | 35469-56010-000 |
| 220 mm rotor | Sting MX4, XXX and specified 2025 MX3 builds. Front and rear use different mounting patterns. | Front 35470-56A70-000 / rear 35591-56A70-000 |
| Kool Stop pads | Use the fitment list for your caliper and match the rotor compound rating. | See listing |
| MX5 220 mm rotor | MX5 Pro front or rear. This rotor is 3 mm thick. | 35470-56C00-000 |
| Brake hose | Original XXX, MX3 and MX4. Match the fitted caliper, hose insert and front or rear length. | See listing |
| Komodo 240 mm rotor | Komodo TL6000. Front and rear use different part numbers. | Front 35470-56D00-000 / rear 35591-56D00-000 |
| Stock Talaria lever blade | For listed non-MX5 brakes. A fits red/blue calipers. B fits the all-black version. | A 35461-56000-000 / B 35461-56A00-000 |
-
Restore the stock brake first
Correct leaks, alignment and friction-surface problems, then bed in clean new pads. A stronger pad cannot compensate for a hydraulic fault.
-
Choose pads and rotors together
Match the pad shape, compound and rotor marking. Luna lists Kool Stop options for specific Talaria calipers. Check compatibility on the product page.
-
Match any system upgrade to the bike
Check rotor diameter and thickness, caliper mount, hose and fittings, lever, sensor compatibility and clearances. Have Luna or a qualified technician confirm the combination.